

On a blue sheet of A4 stick a template of brown paper with a tree cut out. On a flat plate pour white paint quite thin in which we soak a piece of bubble wrap and imprint on the tree template. In this way we get a snowy winter tree.
Material used:
- blue sheet of A4 paper
- brown paper template in the shape of a tree
- bubble wrap
- white poster painte
Related products
-
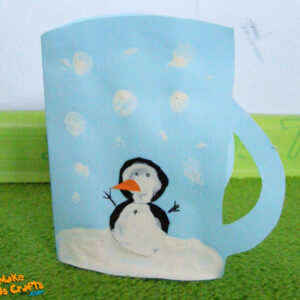 Fold the blue card in half and cut out a cup. Glue the snowman, and glue a triangle to his head. With white paint paint the bellies on the black card, the snow lying under the snowman and the falling snow (reflect the fingertips). With a black pen, paint the snowman's eyes, sticks and buttons. Material used:Read more
- white poster paint
- black pen
- colored technical block
- scissors
- glue
-
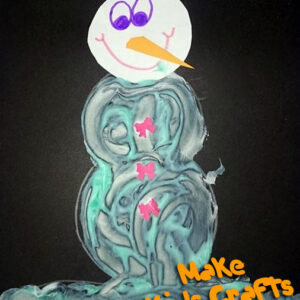 We draw an outline of a snowman on a piece of paper and glue on his head with eyes, a smile and a nose cut out of an orange sheet of colored paper. Children fill in the outline with toothpaste. At the bottom of the card they create snowdrifts with the toothpaste. When the snow is dry, they glue on buttons made of decorative bows cut out with a hole punch. Material used:Read more
- black piece of paper from a technical block
- toothpaste
- glue
- white piece of paper
- pens
- scissors
- colored paper
- decorative punch with a bow pattern
-
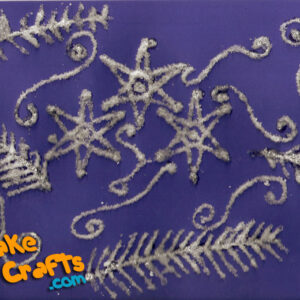 On a colored sheet of paper, draw any patterns you like, then cover them with a thicker layer of glue. Sprinkle the card with sugar. Shake off the excess sugar. Finally, sprinkle with glitter and leave to dry. Material used:Read more
- colored technical block
- wikol glue
- sugar
- glitter

-
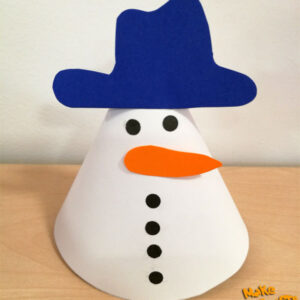 Cut out a circle and cut it in half. Roll it into a cone. Glue or connect with a stapler. Cut out a nose and a hat. Glue the individual elements to the snowman. Material used:Read more
- white and coloured technical block
- traced circle
- circles made with a hole punch
- glue
- scissors
- stapler
Reviews
There are no reviews yet.