

Apply snow star templates to dark cardstock and paint with white paint. Set the stars aside and sprinkle with glitter.
Material used:
- dark colored cardboard
- large paper snowflakes
- white poster paint
- glitter
Related products
-
 First, the teacher prepares materials for the children. On a white sheet of paper they have to draw with a blue marker a semicircular shape of a snow igloo, built of bricks. Then we cut it out - an easy puzzle is created. On a sheet of colored paper - which serves as a background - we draw the same shape (also bricks) with a pencil. The child's task now is to match the individual pieces of the puzzle to the shape drawn on the paper. He glues the individual pieces into the appropriate places - building his own ice house. Material used:Read more
- white sheet of paper
- sheet of colored paper
- blue marker
- pencil
- scissors
- glue
-
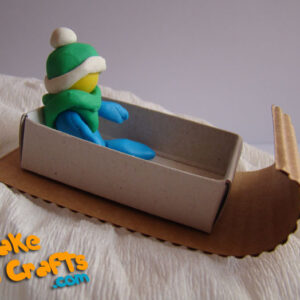 Cut a rectangular piece from corrugated cardboard and twist one end. Glue the middle piece from the matchbox to the cardboard. Put a man made of Plasticine into the toboggan. Such a toy can be successfully used by children for great fun. Material used:Read more
- matchbook
- corrugated cardboard
- scissors
- glue
- plasticine
-
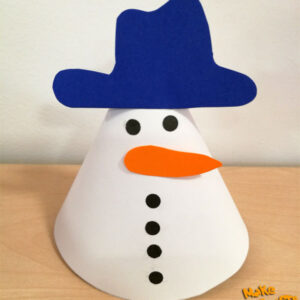 Cut out a circle and cut it in half. Roll it into a cone. Glue or connect with a stapler. Cut out a nose and a hat. Glue the individual elements to the snowman. Material used:Read more
- white and coloured technical block
- traced circle
- circles made with a hole punch
- glue
- scissors
- stapler
-
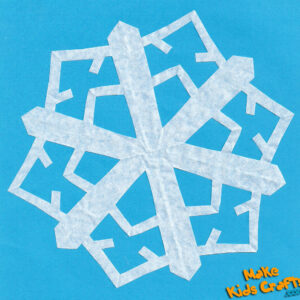 A teacher folds a paper napkin or a piece of greaseproof paper (as showed in the video film). Children’s task is to cut a flexure of a shape which has been created after bending in any manner. A shape created after unfolding is a unique (since each time one can cut it in a different way) snowflake. Material used:Read more
- breakfast paper
- scissors
- blue card
Reviews
There are no reviews yet.