
Showing 17–32 of 34 results
-
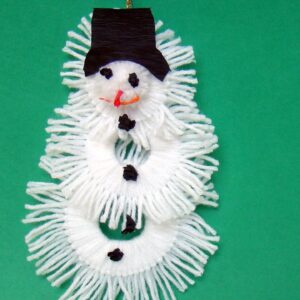 Cut yarn into several pieces with a length of 6 cm, 7 cm and 8 cm. Wrap them around rings of appropriate size in this way: fold a piece in half, put it to the ring with the "ear" on the outside, put the ends through the "ear" and tighten. Repeat these steps until the entire circle is filled. The ends even out with scissors. One ball is ready. Repeat the steps for the remaining circles. Connect the circles with each other using white yarn. At the top of the smallest ball make a hole and pull through it a golden string. Tie its ends together to form a pendant. The interior of the smallest ball lubricate glue and paste pompon. From red tissue paper form a nose, from black tissue paper make balls for eyes, and from orange tissue paper make a mouth. Glue them to the pompom. Again with black tissue paper we make some balls and glue them to the snowman as buttons. Also from black tissue paper we cut out a hat for the snowman and glue over his head. Material used:Read more
- white yarn
- white pompom (diameter about 2 cm)
- black, red and orange tissue paper
- a piece of gold string
- 3 circles of white technical paper, each 1.5 cm thick and with a diameter of, respectively : 4,5 cm; 5,5 cm; 6.5 cm
- glue
- scissors
- pin

-
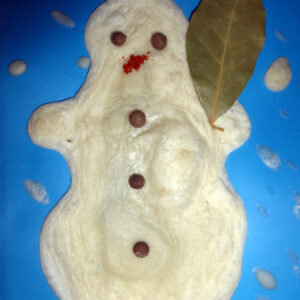 Prepare "growing" paint by mixing water, flour and salt in equal proportions (1:1:1). You can add dye from poster paint. Paint the snowman with this paint and decorate with allspice and pepper (eyes and buttons). We make a broom from a bay leaf and a nose from paprika powder. So prepared snowman we put in the microwave for 30 to 60 seconds, temperature 180 degrees C. Material used:Read more
- flour
- water
- salt
- glitter
- allspice
- pepper
- bay leaves
- paprika powder
-
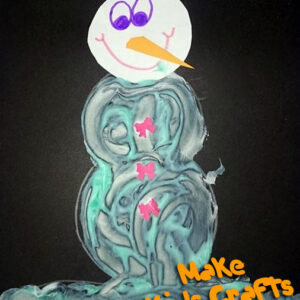
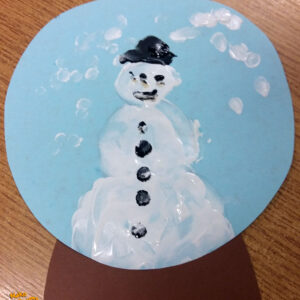 Cut out a circle shape from a blue A4 sheet of paper on which the child paints a snowman with his finger using white poster paint. He paints snowflakes around the snowman and glues its stand under the ball. Material used:Read more
- circle template
- blue and brown drawing block
- white and black poster paint
-
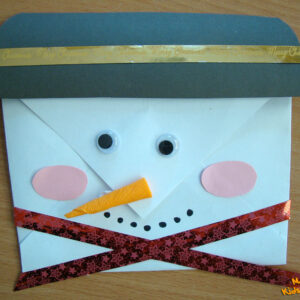 On the envelope we glue the eyes and draw a face. We cut out circles (cheeks) from colored paper and roll a nose from crepe paper. We cut out a hat, add a ribbon and glue all the elements. What's left is to make a scarf for the snowman out of decorative ribbon. Material used:Read more
- envelope
- colored paper
- ribbons
- crepe paper
- movable eyes
- glue
- marker
- scissors
-
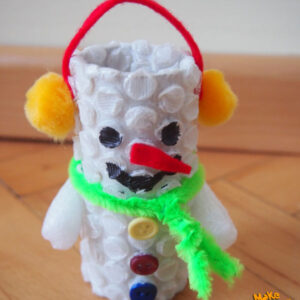 Paint the bubble wrap white. Cover the roll with it. Draw eyes and a smile with a marker, cut out a nose from red felt and glue in place. Creative wire wrap around the roll and twist to hold - this will be a snowman scarf. Under the shawl glue buttons. Under the scarf, on the sides of the roll, glue hands made of SKROPAK crisps. Glue a strip of felt and pom-poms at the top of the roll to create earmuffs. Material used:Read more
- bubble wrap
- white paint
- scissors
- glue
- 2 pompoms
- red felt
- 3 buttons
- creative wire
- toilet paper roll
- 2 white SKROPAK crisps
- black marker
-
 Create a snowman out of muffin tins (2 white and 1 colored one from which you cut out a hat). With spices create eyes, nose and buttons, and cinnamon stick is a broomstick. Decorate the whole thing with stars for confectionery decorations. Material used:Read more
- paper molds
- spices e.g. black pepper, colored pepper, juniper berries, cinnamon
- glue
- scissors
- blue cardboard
- stars for confectionery decorations
-
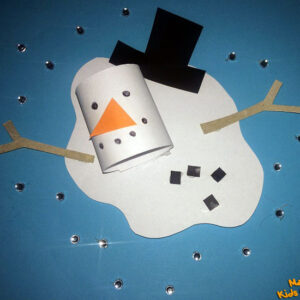 Cut out any stain shape from a white piece of paper, then glue it onto a blue piece of paper. Cut a 2 cm wide strip from the white paper and roll it up. Put the roll on your fingers and draw two dots as eyes and a few dots in the shape of a smile. Cut out a carrot nose from orange paper, a hat and buttons from black paper and hands from brown paper. We glue everything onto a white spot. Stick silver sequins around the melted snowman. Material used:Read more
- white, blue, black and orange card
- sequins
- black marker pen or pen
- scissors
- glue
-
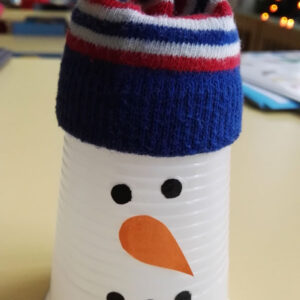 Cut the sock in half and put the part with the welt on the bottom of the cup upside down. Tie the end of the sock with a ribbon. Stick on eyes and nose cut out from colored paper. Material used:Read more
- skarpety dziecięce
- klej
- pomarańczowy i czarny papier
- nożyczki
- cienka wstążeczka
-
 Place the cup upside down. Form a ball out of the white paper and stick it to the cup with tape. Draw a face with markers. Mask the attachment with a tissue paper scarf of any color. From the orange tissue paper roll roll and stick it as a nose. Brown tissue paper roll into a cone and cut in several places to form a hat. We also make a broom out of rolled brown tissue paper. Use a black marker to draw buttons on the trunk. Material used:Read more
- disposable cup
- white sheet
- orange and brown tissue paper
- scissors
- glue
- adhesive tape
- markers
-
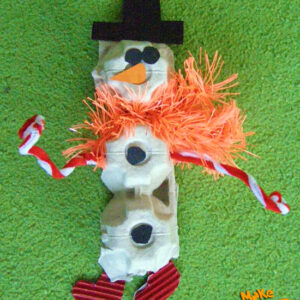 Cut out 2 shoes from red card stock, a triangle from orange card stock, 4 small circles and a hat from black card stock. Glue into a triple egg mold, top with a black hat, then on the first bulge 2 circles and a triangle. Next, string a Christmas tree chain between the two bulges and glue two black circles under it. Punch a decorative wire in the middle and glue shoes cut from red waffle card to the very bottom. Material used:Read more
- glue
- scissors
- christmas tree chain
- paper Egg Cup
- colorful decorative wire
- red corrugated card
- black sheet of technical paper
- orange sheet of technical paper
-
 We draw an outline of a snowman on a piece of paper and glue on his head with eyes, a smile and a nose cut out of an orange sheet of colored paper. Children fill in the outline with toothpaste. At the bottom of the card they create snowdrifts with the toothpaste. When the snow is dry, they glue on buttons made of decorative bows cut out with a hole punch. Material used:Read more
- black piece of paper from a technical block
- toothpaste
- glue
- white piece of paper
- pens
- scissors
- colored paper
- decorative punch with a bow pattern
-
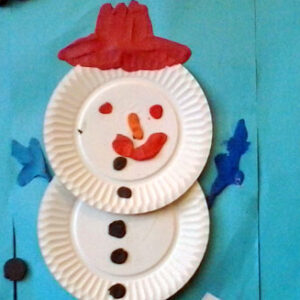 On a blue sheet of paper we stick individual elements (depending on children's choices), these can be cotton pads, paper plates, decorative napkins, then children cut out of colored paper a hat, buttons, eyes, nose or paste the elements with plasticine. Material used:Read more
- round napkins, decorative
- cosmetic pads
- paper plates
- glue
- plasticine
- colored paper
- scissors
-
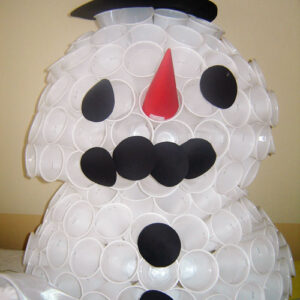 The snowman is made of plastic cups that the children used during their trips (so he is a very ecological snowman). The children put the cups together by themselves and the teacher staples them together with a stapler. Other elements: hat, buttons, nose, eyes and mouth are made of paper. Material used:Read more
- plastic cups
- stapler
- colored adhesive paper
- glue
- scissors
-
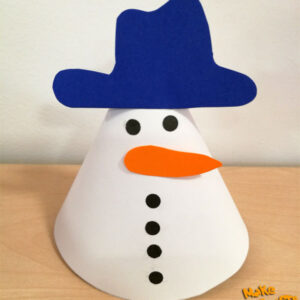 Cut out a circle and cut it in half. Roll it into a cone. Glue or connect with a stapler. Cut out a nose and a hat. Glue the individual elements to the snowman. Material used:Read more
- white and coloured technical block
- traced circle
- circles made with a hole punch
- glue
- scissors
- stapler
-
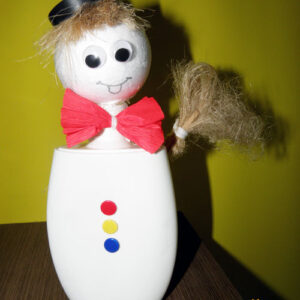 The snowman presented here is a great way to show children how easy it is to conjure up something interesting from materials available in every home, garage, etc. On the unscrewed and cleaned from the label bottle after lotion we put Styrofoam bauble (head). Screw it onto the neck of the bottle or attach it with glue. Next, we put a hat made of cork on the head, under which we paste plumber's hair as the fringe of our hero. Tie a tissue paper bow around his neck to make the snowman look elegant! Now, all you need is a broomstick made of a shashlik stick and the rest of the plumber's hair and a few decorative buttons made of colored pins and you're done! Using a colored bottle and, for example, an onion for a head, we can make a scarecrow in the same way. Material used:Read more
- polystyrene bauble
- plumber's bristles
- rubber sink plug
- white bottle of lotion or shower gel
- tissue paper
- skewer
- colored pins
- string or thread
- glue
- eyelets
-
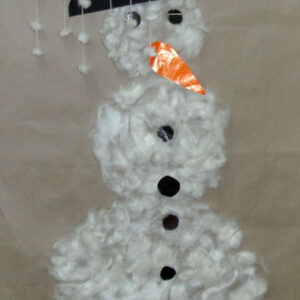 The work shows a snowman made of cotton wool. On a sheet of gray paper we draw three circles, we also draw small circles (buttons) and cut them out. Then we spread glue on the drawn circles and stick on cotton wool. At the end we glue a nose cut out of orange cardboard, buttons and a hat. Material used:Read more
- sheet of gray paper
- black and orange cardboard
- scissors
- cotton wool
- pencil
- glue