

Cut out a circle shape from a blue A4 sheet of paper on which the child paints a snowman with his finger using white poster paint. He paints snowflakes around the snowman and glues its stand under the ball.
Material used:
- circle template
- blue and brown drawing block
- white and black poster paint
Related products
-
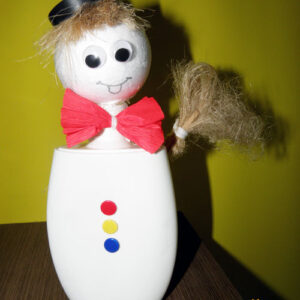 The snowman presented here is a great way to show children how easy it is to conjure up something interesting from materials available in every home, garage, etc. On the unscrewed and cleaned from the label bottle after lotion we put Styrofoam bauble (head). Screw it onto the neck of the bottle or attach it with glue. Next, we put a hat made of cork on the head, under which we paste plumber's hair as the fringe of our hero. Tie a tissue paper bow around his neck to make the snowman look elegant! Now, all you need is a broomstick made of a shashlik stick and the rest of the plumber's hair and a few decorative buttons made of colored pins and you're done! Using a colored bottle and, for example, an onion for a head, we can make a scarecrow in the same way. Material used:Read more
- polystyrene bauble
- plumber's bristles
- rubber sink plug
- white bottle of lotion or shower gel
- tissue paper
- skewer
- colored pins
- string or thread
- glue
- eyelets
-
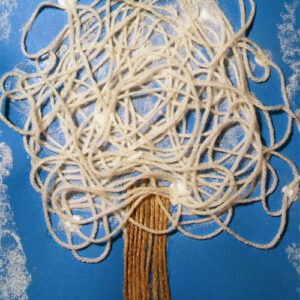 On the blue cardstock, glue the pieces of string (one next to the other) that make up the trunk of the tree. Cover the top of the cardboard with a thick layer of magic glue. Use yarn to create the branches. Sprinkle the empty space (covered with glue) with salt or white decorative sand. Use dry pastels to create a white background of clouds. Material used:Read more
- blue cardboard A4
- white wool
- string
- glue
- scissors
- salt
- crayons dry pastels
-
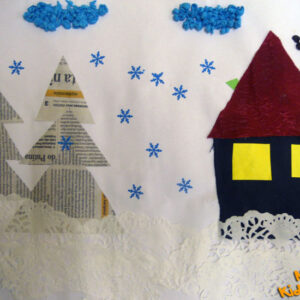 From any materials we create a composition, for example, we cut out trees from gray newspapers, we paste snowdrifts from napkins, clouds are created from balls of blue tissue paper, falling snow cut out with a decorative punch, tissue paper house and chimney smoke from coffee beans. Material used:Read more
- newspapers
- tissue paper
- napkins
- decorative punch
- coffee beans
- glue
- scissors
-
 Place the fabric on the table, the picture on it and tracing paper on the picture. With the help of various tools trace the contours of the picture (without the stars). Press firmly, but only enough to leave a white trace on the tracing paper. If you press too hard, you can make a hole. Use a nail to correct the contours of the stars and the chimney. When all the contours have been corrected, erase the pencil marks on the other side. Turn the sheet of paper over again and place it this time on the fabric itself. Correct some of the less visible contours. Using the head of a pin placed in a skewer stick, apply shadows and snow. Place a piece of canvas under the tracing paper and use the pin head to reflect its texture. We can reflect different objects on tracing paper. It all depends on your idea. In the stars we make a few holes with a pin. We color the picture with markers, but in such a way as not to color the hollows. Such a picture can be for example hung in the window. You can also put a dark piece of paper underneath, which will make the picture even more visible. Material used:Read more
- tracing paper
- sketch of a winter picture
- cutter
- pin
- crochet hook
- nail
- shashlik stick with a pin
- colored markers
- eraser
- piece of canvas
- soft pad
Reviews
There are no reviews yet.