
Showing 17–32 of 102 results
-
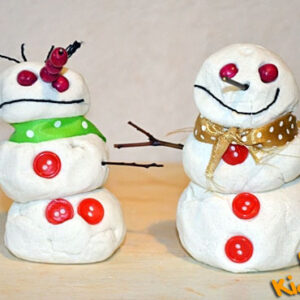 Snowmen were made of homemade dougholine, prepared by the teacher (the ingredients are given in the order of pouring them into the bowl). From the ready mass children stick snowmen, decorate them with twigs, buttons, beads, yarn. Material used: Dougholine:Read more
- 2 cups of wheat flour
- 1 cup salt (fine, not crystals)
- 2 tbsp vegetable oil
- 2 tbsp (flat) baking powder
- 1.5 cups boiling water (the kind that just boiled)
- A dab of white tempera paint to color the mixture white.
- Allspice or beads for the snowmen's eyes,
- twigs for the hands and noses
- yarn for smiles and hair
- buttons
- ribbons
-
 Trace with a glass 6 circles and cut them out, place one above the other and give a string through the center. Glue another three circles together. We glue the balls of the snowman with cotton wool and decorate with cutouts (buttons, nose, hat/hat). Material used:Read more
- cup, glass for tracing circles
- cotton wool
- glue
- colored paper
- string
- scissors
-
 First, children make two pompoms out of white yarn or wool. To do that, prepare two cardboard circles with a hole in the middle for each child (the diameter of the circles in this case is about 4 cm, and the holes 1.5 cm). Children wrap strands of yarn on cardboard circles - remember that to make each pom-pom you need two identical circles. However, nothing stands in the way of reusing the circles cut out of cardboard. The direction of winding: through the hole to the outside of the circle and again to the hole, etc. When the yarn is already wound across the entire width of the circle, and the child finds it difficult to put consecutive strips of yarn through the hole in the circle, carefully move the yarn away from the hole in one place, so that you can insert the scissors between two circles and cut strips of yarn around the circumference of the circle. To prevent the pompom tassels from falling apart, hold the center of the circle the entire time. After cutting the strands of yarn, pull one strand of yarn between the circles and tie all the tassels tightly. The last step in making the pompoms is to pull them out of the cardboard forms. Once you have two pompoms ready, just glue them together. Make the snowman's hat from an egg stamping, the nose from colored paper, and the scarf from felt. Material used:Read more
- white yarn
- Two cardboard circles with a diameter of about 4 cm
- Egg-press (cardboard)
- felt
- colored paper
- movable eyes
- scissors
- glue
-
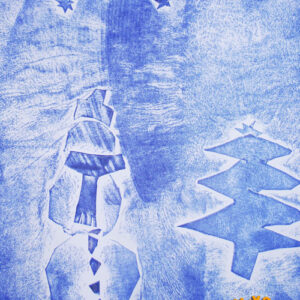 We start our work by sketching the winter aura on a white sheet of technical block (the elements of this picture must be such that they can be cut out). Then we cut them out and put them on a white sheet of tracing paper. Place the tracing paper with the shiny side facing inwards, cover it with the newspaper side and iron slowly with a hot iron. After the card has cooled down, glue all the cut-out elements into the appropriate places on the card. Material used:Read more
- white piece of paper from a technical block
- a white sheet of paper from a drawing block
- navy blue tracing paper (but the less greasy one)
- scissors
- glue
- iron
- newspaper
-
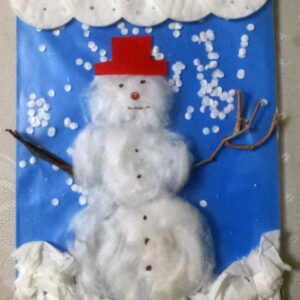 First, the children, together with the teacher, make snowflakes - these are circles cut out of a white sheet of paper by a hole punch, then with the teacher's help the children pour their snowflakes into a T-shirt, which they pin with a stapler to a blue sheet of paper. On the T-shirt they glue a snowman silhouette made of cotton wool, and under it they glue snow from torn pieces of tissue paper. After that the preschoolers receive cotton balls from the teacher, which will be the clouds - they glue them on the very top in the way they choose. Finally the children glue on the snowman's hands from a stick and glue on a hat cut out of colored paper. Once everything is dry children decorate their snowman with glitter markers, paint snowflakes on the shirt, on the clouds. The art work described above is a very attractive form because it allows to stimulate children tactilely and visually, at the same time it is attractive for the preschooler because when he moves or shakes his snowman, the snowflakes move and move giving the impression of falling snow. Material used:Read more
- blue A4 sheet of paper
- A white A4 sheet of paper
- punch
- stapler
- cotton wool
- tissues
- vikol glue
- cosmetic pads
- A4 shirt
- sticks
- glitter markers
- scissors
- coloured paper
-
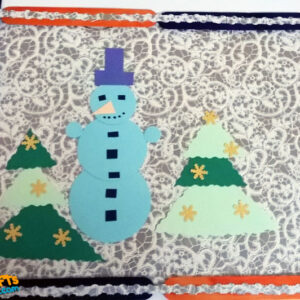 Stick a piece of A4 size wallpaper onto a piece of paper from A3 block. To card stick circles forming a snowman, with triangles create Christmas trees, which decorate with gold snowflakes cut out of punches. Around the wallpaper stick colored sticks of ice cream, and in the middle of these sticks stick a thin strip cut with decorative scissors. Material used:Read more
- pieces of wallpaper
- colorful ice cream sticks
- triangles cut out with decorative scissors
- origami circles
- magician's glue
- A3 block of paper
- golden snowflakes cut out with a hole punch
-
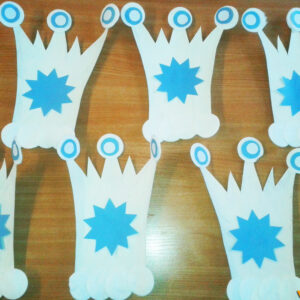 Cut out a crown shape, then paint it white. When dry, decorate the crowns with cosmetic petals, blue circles, and a star cut from blue paper. Material used:Read more
- cardboard on the back of the block
- cosmetic pads
- blue and white paper
- white paint
- brush
- glue
- scissors
-
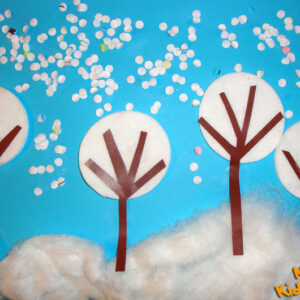 From a brown sheet of paper, cut out the trunk and branches of a tree, then on a blue sheet of paper, glue (about halfway) makeup remover cotton balls and the cut out tree branches to them. At the bottom of the card stick cotton wool, and at the top of the card spread glue and white confetti (excess shake off the card). This is how we created a winter forest. Material used:Read more
- blue and brown sheets of paper
- cotton swabs to remove make-up
- cotton wool
- white confetti from a hole punch
- glue
- scissors
-
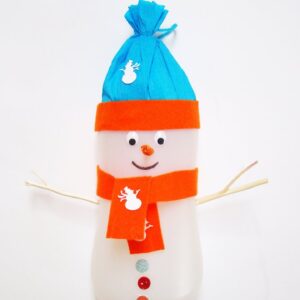 Tape the top of the bottle all around with a strip of double-sided tape. Cut off a piece of tissue paper and stick it on the tape. Tie with yarn at the top. Tape the edges of the tissue paper with a strip of felt. Under the hat stick the moving eyes. Make a hole for the nose (CAUTION! To puncture the bottle you need a sharp knife, this operation should be done only by an ADULT) and attach in it a toothpick. Cover the toothpick with orange tissue paper or colored paper. Draw a smile with a pen. Cut out a strip of felt for a scarf and stick it under the head. Cut the ends to form a fringe. Create holes on both sides and attach in them sticks. Glue small buttons. Decorate the scarf and hat with elements cut from a hole punch (snowman shape). Material used:Read more
- large bottle
- felt
- glue
- two sticks
- toothpick
- colored paper
- buttons
- moving eyes
- crepe paper
- crewel

-
 First evenly place 7 sticks. Move the end ones away so that they are 1/4 centimeter. Put a drop of glue on each stick and glue across the next seven sticks, starting from the ends, so that we have holes left. Do the second platform the same way but use 1 more stick. Use a paperclip to stiffen the glued sticks and let the glue set. Then take twigs (about 30 cm), divide them into two groups of 2 or 3 twigs and tie a string on them. One at the beginning of the twigs and the other at a distance equal to the length of the stick (minus 1.5 cm). In the next step, we thread a smaller platform of sticks onto the string from the twigs. Position the twigs so that they face opposite directions. Cut straws for drinks (two longer and two shorter by 2 cm). Thread the cut straws on the string so that on one side were longer straws and on the other shorter. Then thread on the string a larger platform (roof). If you have difficulty threading the string, you can help yourself with a thin wire. Then, tie all the strings together and tie a knot 15 cm above the feeder. Glue a seed lid on the bottom of the feeder and glue wooden bread clips on both sides. Material used:Read more
- sticks
- string
- drinking straws
- glue
- jar lid
- scissors
- clips
-
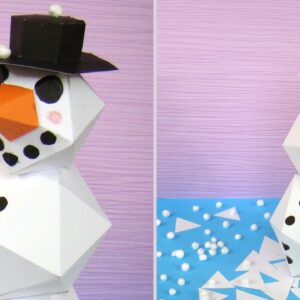 Nose Cut out the snowman's nose from the template. Bend the tabs upwards (you can run scissors or a circle along the line - it will be easier to fold), fold along the line into a pyramid and glue. Hat Cut out a rectangle and glue it together to form a hexagon. Cut out a large hexagon and in its center a smaller one. Paste the glued hexagon into the cut out hole. Cut out a third hexagon, fold the tabs and use them to glue the hexagon on the underside as the hat's lid. Snowman Cut out printed templates along the solid lines and then fold them along the dotted lines. Glue them together using tabs. From a black piece of paper, cut out two larger circles and five smaller ones - eyes and smile; and a few medium ones - buttons. We glue the eyes, nose and smile to the smallest white solid. Glue a hat on top. Glue more solids together to form a snowman. Now glue the buttons to the snowman. Glue the triangles you cut out (or other pieces of white paper) to the blue card. Then glue the snowman and at the end of Styrofoam balls - snow. Material used:Read more
- white sheets of technical A4 with printed template in three sizes
- a black sheet A4 from the technical block
- orange sheet of A4 paper
- polystyrene balls
- blue sheet of A4 paper
- glue
- ruler
- pencil
- scissors
- red crayon
-
 A strip about 7 cm wide is cut from the crepe paper. The cut must be made across the wrinkles. Fold the strip in half. This will form a circle. At the point of bending stretch the crepevine. The resulting spiral roll into an icicle. Start from the end. Layers should strongly overlap each other, and then expand more and more. Cut off excess crepevine. Glue the protruding part and align with scissors. To be able to hang the decoration thread the wider part of the icicle and make a knot. Mix magic glue with glitter and add a little water. Using a paintbrush, paint the edges of the icicle. The glue will become transparent after it dries. If you want to make smaller or larger icicles then just choose the width and length of the crepe paper strip accordingly. Material used:Read more
- white crepe paper
- magic glue
- silver, loose glitter
- water
- thread
- scissors
- brush
- needle
- plastic plate
-
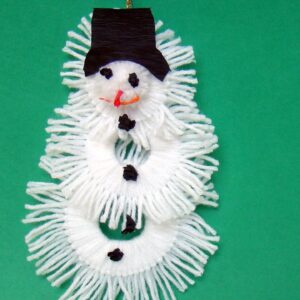 Cut yarn into several pieces with a length of 6 cm, 7 cm and 8 cm. Wrap them around rings of appropriate size in this way: fold a piece in half, put it to the ring with the "ear" on the outside, put the ends through the "ear" and tighten. Repeat these steps until the entire circle is filled. The ends even out with scissors. One ball is ready. Repeat the steps for the remaining circles. Connect the circles with each other using white yarn. At the top of the smallest ball make a hole and pull through it a golden string. Tie its ends together to form a pendant. The interior of the smallest ball lubricate glue and paste pompon. From red tissue paper form a nose, from black tissue paper make balls for eyes, and from orange tissue paper make a mouth. Glue them to the pompom. Again with black tissue paper we make some balls and glue them to the snowman as buttons. Also from black tissue paper we cut out a hat for the snowman and glue over his head. Material used:Read more
- white yarn
- white pompom (diameter about 2 cm)
- black, red and orange tissue paper
- a piece of gold string
- 3 circles of white technical paper, each 1.5 cm thick and with a diameter of, respectively : 4,5 cm; 5,5 cm; 6.5 cm
- glue
- scissors
- pin
-
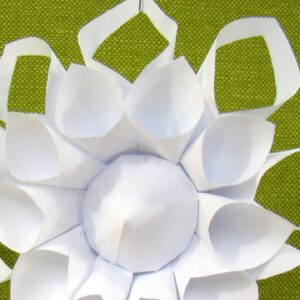 Cut out 10 each of the larger and smaller teardrop shapes (drops) from the paper. Inside the large drops cut out a teardrop shape with two tops. From a stiff piece of paper cut out a circle with a diameter of about 7 cm. Grease the drop with glue on one side of the hole and glue it together forming a pointed cone. Glue small drops in a similar way. To a circle of stiff card glue large cones so that their tops touch each other. The lower part of the cones flatten, lubricate with glue and paste the small cones. Their center also flatten. From a square sheet of paper cut out a circle and cut it from the edge to the center. Slide the parts over each other and glue to form a cone slightly larger than the flattened center of the cones. Cut the edges of the cone and fold under the bottom, so that it fits into the flattened part of the snowflake. Brush the cut edges with glue and glue to the inside of the snowflake. The finished Snowflake can decorate, for example, our window. Material used:Read more
- 4 white A4 sheets
- technical block
- glue
- scissors
-
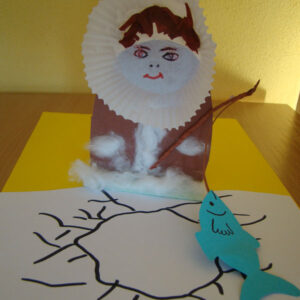 Cut out an oval shape from a stiff piece of paper of any color. This is the body of our Eskimo. Bend the end to have a tab to glue on. At the top we glue a cupcake mold. On the bottom of it we draw the face of the Eskimo. We make hair out of shavings of brown or black tissue paper. Glue cotton wool fur to the coat. We make a fishing rod from a strip of cardboard rolled up. At the end stick a fish, cut out of blue or gray card. We make a pad from a white piece of paper, on which we draw an irregular circle with broken lines - this is an icebreaker for catching fish. Material used:Read more
- paper cupcake mold
- markers
- tissue paper
- glue
- brown cardboard
- cotton wool
- white paper
-
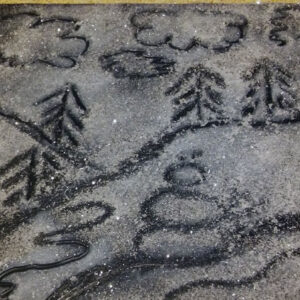 Black cardboard from technical block grease vegetable glue (quite thick) and sprinkle salt mixed with silver glitter. With an inverted brush draw a winter landscape by dropping the scraped salt. Material used:Read more
- black cardboard
- vegetable glue
- salt
- glitter
- brush